How to insert Google Analytics tracking code in WordPress website/blog? In this guide, we will learn to install Google Analytics in our website.
Google Analytics, which has now launched GA4 (Google Analytics 4) that provides better tracking, is one of the most popular website analytics service.
Website traffic volume, or the number of visitors to your website, defines the success of your blog. How do you find the number of people viewing your website? How to track which articles are the most popular ones and generate the maximum traffic? Where do your visitors come from? What countries bring the maximum traffic? Website analytics answers all the questions about your website traffic and visitors.

Creating Google Analytics Account
Your first step is creating a Google Analytics account, unless you already have one.
Create a new Google Analytics account by visiting https://analytics.google.com, click the Sign in to Analytics button (top right) and use your Google account details to login. Or, click on the Get Started button if you want to create a new Google account for your website. If you need a separate account for your website or app, you can register a new account. This is useful when you have your personal and business accounts separate.
Make sure that you are clicking only on the FREE option button. (Don’t try to sign in to the premium services. You will find Google Analytics option below the premium services.)
- Go to https://analytics.google.com.
- If you’re new to Analytics, click “Start measuring” under “Welcome to Google Analytics.” Create a new account or log in to your existing one.
- If you have an existing account and want to create a new Google Analytics account, go to “Admin,” click on “Create Account” in the Account column.
- Give your account a name (your business name or something to identify) and decide what data you want to share with Google by configuring data-sharing settings.
- Click “Next” to add your first property to the account.
Creating a New Google Analytics 4 Property
To add properties to a Google Analytics account, you’ll need the Owner / Editor role. If you created this account, you already have the rights. You can add up to 2,000 properties (mixing Universal Analytics and Google Analytics 4) to an account.
To create a GA4 property:
- When creating a new account and continuing from “Create an Analytics account,” you will be directly taken to the next step for adding a property.
- If you already have an analytics account and want to add a new website to it, click on the “Admin” menu at the bottom-right, and double-check that the account name in the “Account” column to make sure that the right account is selected. Then, in the “Property” column, click “Create Property.” If you’re creating a new account and continuing from “Create an Analytics account,” skip this step. You will be directly taken to the next step.
- Name your property (e.g., “My Business”), choose the reporting time zone and currency. The time zone is crucial as it affects when visits are recorded, especially across different time zones. Set the time zone to your location.
- Click “Next.” Select your industry category and business size.
- Click “Next.” Specify how you plan to use Google Analytics. Google Analytics tailors your default reports to meet your intended usage.
- Click “Create” and, for new accounts, accept the Analytics Terms of Service and Data Processing Amendment.
- Continue to “Add a data stream” to start collecting data.
Adding a Data Stream
After creating a Google Analytics account and adding a website as a property for which you want to track visitors and usage, it’s time to actually set the data stream.
- In “Admin,” make sure you’ve selected the right account in the “Account” column and the correct property in the “Property” column. Under “Property,” click “Data Streams” > “Add stream.” This step is valid only when you are trying to add a new data stream to an existing property in your GA account. If you are creating a new account or adding a new property, you will not find this step and be presented with the next step directly.
- Now, choose “Web” as your data steam as we want to track visitors on our website.
- Enter your primary website’s URL (eg: “example.com”), choose between “https” and “http” (select https if your website supports), and give a Stream name (eg: “My Business – Web”).
- You can enable or disable enhanced measurement, which automatically collects page views and events. It’s recommended to enable it for now; you can always disable specific events later.
- Click “Create stream.”
Copy GA4 Tracking Code
To set up Google Analytics tracking, you will need either your Analytics tracking ID or the entire Javascript tracking code snippet. This tracking ID or code identifies your website or Analytics property. To find the tracking ID and code snippet:
After creating the Google Analytics property and data stream, you need to add the tracking code to your website. Here’s how to get your tracking code for GA4.
- Sign in to your Google Analytics account.
- Click “Admin.”
- Under “Property,” select your property.
- Under “Property,” click “Data streams” > “Web.”
- Choose the data stream for your website.
- Under “Google tag,” click “View tag instructions.”
- On the “Installation instructions” page, select “Install manually.” You’ll see the JavaScript snippet for your Google tag. It starts with “<!– Google tag (gtag.js)” and ends with “</script>.”
- Copy this Google tag code. (Keep it in a text file for later use.) We need to add this code right before the “</head>” section on each of your website’s pages. In WordPress, you can add the code via a plugin or by editing the theme functions.php or header.php file.
To collect website traffic data, you must include the Google Analytics tracking code on every web page you wish to track. Unless you are using a HTML website created manually, you don’t have to add this manually to each page you create. Just add the analytics code in the WordPress theme or via the options provided with your theme.
Data collection may take up to 30 minutes to begin. You can check the Realtime report to confirm data reception.
Adding Google Analytics code using WordPress plugin
In WordPress, you have several plugins to easily add Google Analytics code to your website. Install the WordPress plugin and follow the simple procedure.
If you’re looking to integrate analytics tracking into your WordPress website without dealing with code, using a plugin is a simple and effective approach.
- Choose and Install a Plugin
- From your WordPress dashboard, navigate to “Plugins” and click on “Add New.”
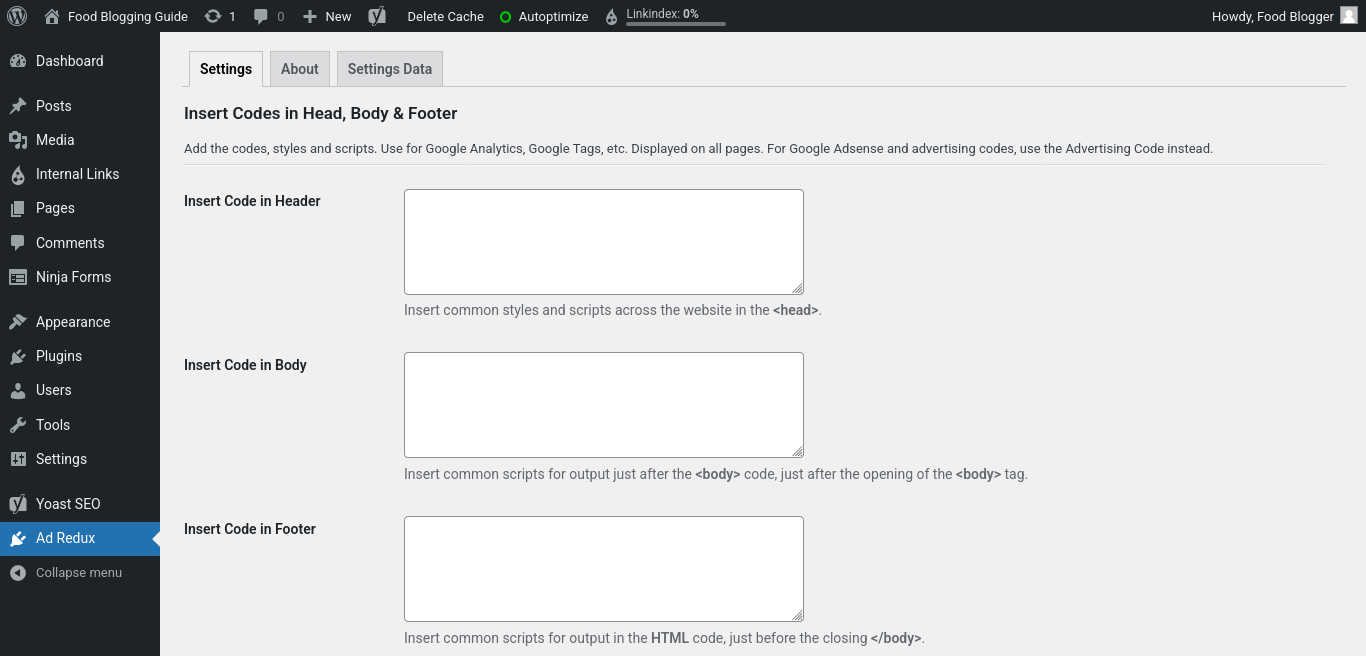
- Search for a suitable analytics plugin using “Google Analytics” as the search keyword. You can use the “AdRedux” plugin to add Google Analytics as well as advertisements and other codes. Select any plugin of your choice. Install and activate the plugin.
- Connect Your Analytics Account
- After installing and activating the plugin, you will have to paste the Google Analytics tracking code that you have copied earlier. Paste your GA4 tracking code in the relevant field so that the code is displayed in the <head> section of your website.
- Some plugins such as Google Site Kit and MonsterInsights need you to integrate your Google Analytics account. This involves signing in to your Google account and granting permission.
- Configure the Plugin Setting:
- Once connected, you’ll may have access to various settings provided by your plugin. You can typically configure what to track, such as page views, downloads, outbound links, etc.
- Some plugins might offer additional features like tracking eCommerce activity, forms, and more. Choose the options that match your goals.
Add Google Analytics tracking code in WP theme (manually)
Once you have the Google Analytics tracking code, it is time to paste it in your theme file to take effect.
- Go to WordPress website Dashboard -> Appearance -> Editor
- Make sure that ” Select theme to edit:” option shows your current website template in use. (If the theme in use is a child theme of any template, you may not be ale to find the header.php file. In such case, select the parent template/theme of the active child theme.)
- In the right side, you will find a list of files. Locate the Theme Header (header.php) file and click on it.
- Locate </head>, and create a line above it by clicking the Enter button.
- Paste the Google Analytics code just above </head>.
- Make sure to Save by clicking on the Update File button.
You will have to repeat the process whenever you change the theme in use on your WordPress site.
Track website visitors without visits from logged in users
Google Analytics will track all visits to your website, including yours. When your visits are also logged and recorded, it many distort the data. If you wish to remove your own visits to your website being tracked by Google Analytics, use the code below.
What is happening here? In the code snippet, we have wrapped the analytics tracking code with a WordPress PHP code that suppresses the tracking code if the user is logged in. So, this piece of code track all the visits to the website where the user is not logged in. You must access your website only after logging into your WordPress website to keep your websites visit from being counted by analytics.
<?php
 if ( is_user_logged_in() ) {} else { ?>
 <!-- Add Analytics Code Below -->
 <?php } ?>
Your analytics code should now look like this:
<?php
 if ( is_user_logged_in() ) {} else { ?>
<script>
....Actual Code...
</script>
 <?php } ?>
Use the method descried above to manually add the tracking code to any WordPress theme. It’s advisable that you make changes to a theme only through a child theme to avoid your codes being deleted or overwritten with updates or theme change.
Website Design & WordPress Installation Service: ➡ Need help creating your website or blog? We can help you pick the right web hosting, install WordPress blogging system optimally and help you launch your website. Connect with us for WordPress blog installation and web design services.