You can use your own domain branded emails with Gmail for free. You do not need to subscribe to the Google Apps or Google for Work service. In the beginning, do not spend any money on Google Apps or Email, SSL Certificate, Website Back-up Package, or SEO Packages being sold by webhosting or domain registrar companies.
Before you proceed, keep the SMTP & POP/IMAP email server, Port number and other details for the email address handy. You can find these details in the hosting control panel’s Mail section under the Configure Email Client or Email Configuration heading. The login username and the password will be the same as that for the email.
Send email from your domain email using Gmail
- Log in to your Gmail account.
- Click on the Gear icon at the top right corner to open the Settings page for Gmail.
- In the Settings page, click on the Accounts & Import tab.
- Now, you need to add the email account as well as enable sending email via the new address.
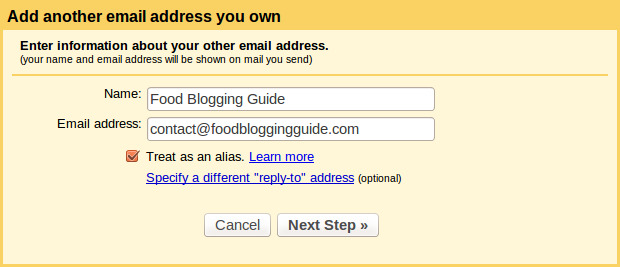
- Go to the “Send mail as:” section on the page and then click on the “Add another email address you own” link.
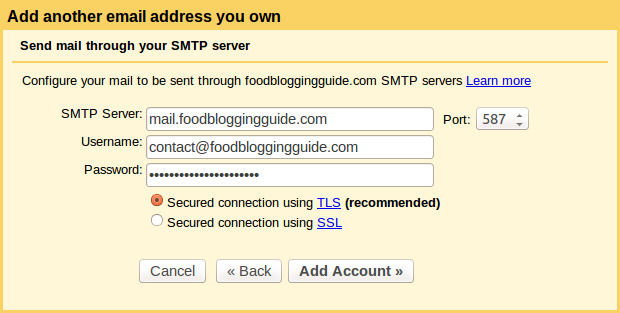
- Add the SMTP server address, email username (generally the email address) and password, the port number depending on the TSL or SSL setting you choose. (You must use the details provided in your hosting control panel’s email settings.)
- Now, Gmail will get connected with your custom email address on verification. Open your other account and either click the link in the message Gmail sent or enter the confirmation code in the Accounts and Import section of your Gmail settings. If Gmail sent a verification email and you didn’t receive it, try checking your Spam or Bulk Mail folders for a message from account-verification-noreply@google.com to see if the email ended up in there.
- To use one of your other email addresses, click the From link when you compose a new message. Each time you need to send email from your custom branded email address, open the Compose Email box in Gmail, click on the From link of the email composition page. You will get the list of all email addresses linked to your Gmail account. Choose the email address that you want to send your email from.
- If you are replying to or forwarding a message, click the “To” field where your recipients are listed, then click From. You will get a drop-down menu next to your address to select the email address to send from.
- Click the gear in the top right
.
- Select Settings.
- Click the Accounts and Import tab.
- Under Send mail as, click Add another email address.
- In the ‘Email address’ field, enter your name and alternate email address you own.
- Enter the SMTP server (e.g. smtp.domain.com), your username on that domain, and your password for that account. You may also need to adjust your port setting or SSL setting (talk to your other ISP if you need this information).
- Click Add account >
Additional information
Your other email provider has to provide authenticated SMTP support for you to use this option. We’ll use TLS by default, or SSL if you enable it. Many email services that provide POP or IMAP support also offer authenticated SMTP support, and you can likely find your SMTP server configuration instructions alongside information about POP or IMAP. Also, this new version of custom ‘From:’ doesn’t work with Yahoo! Mail Plus accounts just yet.
If the address you’re adding is hosted by Google (either a Google Apps account or a @gmail.com address), your original address will still be included in your email header’s sender field to help prevent your mail from being marked as spam. Most email clients don’t display the sender field, though some versions of Microsoft Outlook may display “From yourusername@gmail.com on behalf of customaddress@mydomain.com.”
Receive emails from your domain email using Gmail
- Log in to your Gmail account.
- Click on the gear icon at the top right corner to open the Settings page for Gmail.
- In the Settings page, click on the Accounts & Import tab.
- Now, you need to add the email account to view the mails received at the new address.
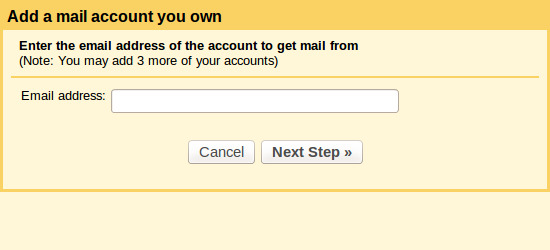
- Go to the “Check mail from other accounts (using POP3)” section on the page and then click on the “Add a POP3 mail account you own” link.
- Enter the full email address of the other account, then click Next Step.
- Enter the password for the email address being added.
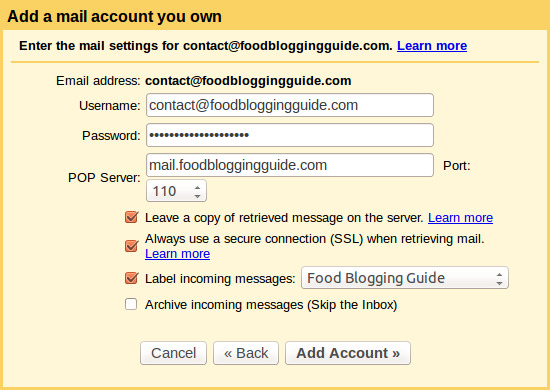
- Now you have a few options to choose from.
- Leave a copy of retrieved messages on the server – Check the box if you want to keep a copy of the email on your website server apart from having it in Gmail for safety.
- Always use a secure connection (SSL) when retrieving mail – Keep checked.
- Label incoming messages – Check the box and add your own Label for easy organization of emails in your Inbox.
- Archive incoming messages – Don’t check. If you check this option, all emails to this address will be archived in Gmail and you will not see new messages from the other account in your Inbox.
- Once your account has been added successfully, you’ll be asked if you want to be able to send mail as this address. This allows you to compose messages in Gmail, but have them appear to be sent from your other email account.
- Each time you need to send email from your custom branded email address, open the Compose Email box in Gmail, click on the From section of the email composition page. You will get the list of all email addresses linked to your Gmail account. Choose the email address that you want to send your email from.
Website Design & WordPress Installation Service: ➡ Need help creating your website or blog? We can help you pick the right web hosting, install WordPress blogging system optimally and help you launch your website. Connect with us for WordPress blog installation and web design services.