Want to become a food blogger in India? Don’t know how to start a food blog in India? How to become a food blogger & get paid in India?
Beware! It’s a 3,750-word article. Get yourself some tea, snacks and plenty of time to read it. You are also required to take action to actually build your food blog. So, keep a pen and notebook handy for taking notes too.
How can an Indian start his/her own food blog and make it a full-fledged profession or business? Don’t expect it to be any easy.

Are you passionate about cooking and cuisines? Are you a professional chef looking to start your own food blog website in India? Though starting a food blog, whether in India or anywhere else, requires the same kind of work, there is a small, and critical, difference in each country.
➡ Need help creating your website or blog? We can help you pick the right web hosting, install WordPress blogging system optimally and help you launch your website. Connect with us for WordPress installation and web design services. ♥
In this article, we will learn how to start your food blog in India and earn money as an Indian food blogger.
For Indian food bloggers, the trends and best practices are not the same as that of US bloggers. Starting a food blog in India is no different from that in any other country, say, starting a food blog in US. The only main difference is the strategies involved in getting your food blog that attention it deserves, finding new partnership avenues and earning money from your food blog in India. The food blog monetization strategies that work for US food bloggers will not be very effective for an Indian food blog.
How to Start Your Food Blog in India & Earn Money: Basic Steps
Here are the basic steps to create a self-hosted WordPress food blog that makes you look like a professional food blogger. You cannot afford to look like a college student blogger. Your food blog must have own its domain name and a professional design. Don’t expect to get popular with a free Blogger.com or WordPress.com blog. Simply follow these steps to get your professional food blog started in no time.
1) Buy a domain name for your blog
Domain names are short, memorable web addresses such as foodbloggingguide.com. As an Indian food blog, you can also use .co.in or .in domains. (yourblogname.in).
Cost: free with web hosting or around Rs 100-1000 per year .
2) Find good web hosting
A web hosting is the place where all your website files and data are stored. So, your website hosting server is the home of your website. Always get the best and reliable web hosting.
Cost: Rs 4,500 / year (approximate).
Important for India: I recommend buying web hosting from a US-based hosting if your target audience is global. It works effectively for both US & Indian traffic. You will benefit if your target audience is affluent Americans. Use your credit card, PayPal, debit card for payment. Alternatively, you can generate virtual credit card using net banking or get help from a friend or family.
3) Install WordPress
WordPress.org is the most popular blogging software, which is also used even by many popular Indian news websites. WordPress is easy to use and manage even for beginners.
Cost: absolutely free!
4) Install WordPress theme
Your WordPress theme determines the design and feel of your food blog website.
Cost: free
5) Install WordPress plugins
For a food blog, you will need some extra functions that are no built-in the blogging platform. WordPress plugins add specific features and extend the functionalities of WordPress.
Cost: free
6) Set up webmaster tools
As a website owner, you need to keep track of your website visitors and also the health of your website. Google offers invaluable tools and services: Google Analytics & Webmaster Tools.
Cost: free
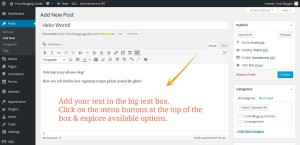
7) Start blogging!
Publish your recipes, restaurant review, stories and photos.
Cost: hard labour & time
Watch the video: Here’s a video explaining the entire process of using Bluehost (US) for creating a food blog. Make sure that you use Bluehost USA (and not India) if your target audience is US.
Start Your Food Blog in India: Step-by-Step
Now that you are aware of the basic steps involved in creating food blog (or just any blog website) using WordPress, let us discuss each step involved in creating a food blog in detail. Beware, it is going to be a lengthy article. Nothing difficult, though.
For this article, I am assuming you already have a good idea about the type of food blog you are going to create. If you haven’t planned your blogging topic, niche segment and content strategy, start with a pen and notebook.
Create a rough draft of what type of food blog you want to start. Is it going to be a vegetarian recipe website? Will it be a food travel blog? Will it be about a geographical cuisine?
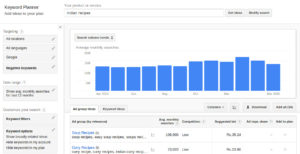
Once you know what you want, think of catchy names and jot them down. Also, create a list of articles that you will start writing once you have created your food blog. Get a list with at least 50 articles and/or videos. If you are having trouble finding topics, you should consider a different approach for your food blog.
Like all business and profession, food blogging requires hard work. You have to spend lot of time and energy creating your food blog, earning a reputation in the industry as an established Indian food blogger, and also build your own network in the food blogging community and the Indian food industry.
When you have your food blogging plan ready on paper, start with the actual setting up your food blog following the steps as outlined below.
Step 1: Buy a domain name for your blog
As mentioned earlier, domain names are short, memorable web addresses such as foodbloggingguide.com. Domain name is going to be the identity of your food blog website. It is a unique name that will identify your blog on the Internet.
As an Indian food blog, you can also use .co.in or .in domains. (yourblogname.in).
Make sure that your domain name is not too long, is catchy and easily memorable. Avoid confusing spellings. Also, do not use brand or trademarks in your domain name. Avoid domains with hyphens or numbers. Your food blog domain name should also tell about your blog’s specialty.
How to pick the right domain name? Look for the following:
- Short & memorable
- Descriptive for better understanding
- No spelling errors or confusion
- Avoid hyphens, numbers
- No brand or trademark in the name
- Check Facebook, Twitter & Instagram usernames available
You can also find some good options for food blog domain names in the list of expired domains. An expired domain with past history and backlinks can work wonders in quickly ranking your food blog. Beware, it can also backfire if the domain had a bad reputation in the past.
Visit Godaddy.in, Net4.com or BigRock.in. Search for the names you have thought of for your food blog. You might have to think hard before you can find the right domain name that is also available for registering. Keep repeating until you find a suitable domain name that you can register.
You can use Godaddy coupon or Bigrock coupon to register your first domain for Rs 100 for the first year. Simply Google and use the valid coupon or promo.
Recommended: As you are just starting, you should register your domain with web hosting company itself. This way you get to save the steps involved in linking a domain name with web hosting server location. You can search for available domains with any of the domain registrars or directly on the website of your preferred web hosting company in India.
Step 2: Find reliable web hosting provider
As your food blog will be served to the world by web hosting server, it is one of the most critical components for any website or blog. Your website is accessible to the world wide web from your web hosting server. You need a web hosting provider with highest reliability in terms of website uptime. Meaning, their web server hardwares should be always up and running so that your website is accessible all the time.
If your web hosting company does not have good reputation, your food blog website will often remain unavailable, or down. A food blog that is not available for visitors is not the best thing for the growth prospect of your blog.
To start with, we are going to purchase shared web hosting space. As we are just starting our food blog, we only need a small amount of space for our website and limited computer resources to keep our website running. So, we are not going to purchase dedicated server or VPS (don’t worry about what it means).
As we are using WordPress for our food blog, you need to buy Linux web hosting with cPanel admin dashboard for easy website management. You can buy web hosting space and domain name with one company to save the hassle of linking domain with web hosting.
If you plan to start multiple blogs or websites, make sure you buy the right hosting plan. You can install and run multiple websites from single web hosting itself. In this case, we will buy shared web hosting plan on Linux server that allows us to run multiple websites on the same hosting package.
Step 3: Install WordPress blogging software
WordPress is the undisputed leader and the most popular blogging software, which is also used even by many popular Indian news websites. WordPress is easy to use and manage even for beginners. You can download WordPress from WordPress.org and install it on your website.
Here’s how to install WordPress quickly on BlueHost web hosting.
- Log in to your Bluehost Hosting account.
- Open the My Sites tab from the side menu on the left.
- Click on the Create Site button.
- Enter the Site Name and Site Tagline for your blog.
- Click Next.
- Select the domain you wish to install to from the drop-down list.
- Choose the directory this should be installed to, and click Next. For us, it should be the main folder (top level, www or public_html folder)
Using another web hosting company? Most web hosting providers also allow you to install it directly within your web hosting control panel. You can check the support articles of your web hosting company to see how to install WordPress on your hosting.
Once you’ve installed WordPress, you will have to update the website immediately. Log in to your WordPess blog dashboard, and make these changes:
- Delete the dummy content post & page
- Change the website tagline. Go to Settings > General and update it.
- Set the permalink URL structure. Go to Settings > Permalink Settings page and change your permalink structure to “Post name”.
Now, it’s time to further customize your newly installed food blog with a nice theme that goes with our blog.
Step 4: Install WordPress theme
Once you have WordPress installed on your website, log in to your new blog. Now, it’s time to find a good theme that matched your blog idea in terms of content display and design. You can find and install good WordPress themes for your food blog directly within your WordPress website dashboard.
- Log in to your WordPress blog website
- Go to Appearance > Themes > Add New
- Explore the themes & click on “Install” button on the chosen ones
- “Activate” the theme on your website
- Go to Appearance > Customize to set up the theme
WordPress themes determine the design and look of your food blog website. Some WordPress themes are only available by purchase, but we will avoid them for now.
Picking the right WordPress theme for your food blog: If you are not sure how to pick the right theme for your WordPress food blog that you just created, here are some things that you should look for.
- Clean and elegant design
- Responsive design, works perfectly even on mobile devices
- Suits the overall concept of your food blog
- Optimized for Search Engine Optimization (SEO)
- Easy to customize
You can find great blog themes at WordPress.org, the official theme repository.
Our food blog WP themes available for FREE on this website are based on popular premium WP theme framework Genesis by StudioPress. You will have to purchase the Genesis theme framework or download it from freely available sources (100% legal, but without any support). Google “Genesis framework free download” to find latest version for free download.
Recommended free WP themes for your food blog? You can search for these themes directly in your WordPress blog dashboard and install them.
Tips for designing a user-friendly food blog
When you are customizing your WordPress food blog, try to follow these recommendations.
- Clear navigation: Keep your blog clean and uncluttered. Your blog should be easily navigable. Place your menu links in the header so that visitors can find what they’re looking for. Organize your content in proper categories, and add the category links in the main header navigation.
- Encourage social sharing: Add links to your social media pages prominently across the website. You can also insert social media sharing buttons before/after each post content, and on all pages. You should also add a Facebook and/or Instagram page widget in the sidebar or via a pop-up.
- Commenting: Allow people to comment easily. You can fight comment spam with Akismet WP plugin or other suitable methods without discouraging your visitors from leaving comments.
5) Install WordPress plugins
For a food blog, you will need some extra functions that are no built-in the blogging platform. WordPress plugins add specific features and extend the functionalities of WordPress. Learn how to install a WordPress plugin before you go ahead.
Important: Every plugin adds to the load on your web server for showing your website. Do not add unnecessary plugins to your WordPress blog. Keep the number of plugins to the minimum.
Here are my recommended WordPress plugins for your food blog.
- WP Super Cache: When using WordPress, the website is dynamic and generated by your web server each time a page is requested by your visitor. It requires computing power. Website caching is the method of creating static cache files for your webpages. It speeds up your website speed as the website shows up from a ready file instead of being computed by the server.
- WordPress SEO or SEOPress: For search engine optimization, you need this plugin. It allows you to add SEO titles, descriptions, keywords and also manage whether search engines should include the page in their index or not. This plugin also allows you to set up Google Analytics, Google Webmasters, add your social profiles, author information, and show XML Sitemap for your food blog.
- Recipe Box: Exclusively available on this website, this WordPress plugin allows you to add your recipes in style with proper SEO automatically generated. You can also use other WP recipe plugins as an alternative.
- WP Recipe Maker, EasyRecipe: Add recipes on your food blog.
- AdRedux Advertising Manager: Easily show ads, newsletter box, notice, etc. Use it to insert website tracking and analytics code, and other codes. You will need this plugin later when you start showing ads on your food blog website.
Avoid using a contact form plugin. Why? Better to keep your server load low as only a few people are going to use the contact form. Instead of a contact form, simply add your email address and phone number, etc on the contact page.
6) Set up webmaster tools
As a website owner, you need to keep track of your website visitors and also the health of your website. Google offers invaluable tools and services: Google Analytics & Webmaster Tools (Google Search Console).
First, create a new Google account and email (Gmail) address for your blog. You can then connect your new email with your primary Gmail account to avoid having to check two different accounts. If you use mobile apps, you can configue the new Gmail account there too. Create a new Gmail account here.
Once you have a Google account, set up the following webmaster tools:
- Google Analytics: Helps you track food blog traffic, source of visitors, searches that you rank for, average pages viewed and time spent by visitors, and more. (Note: Install the Google Analytics tracking code manually or using the WordPress SEO plugin settings.)
- Webmaster Tools: Helps you keep track of your website status and also monitors presence in Google search rankings. It can be useful in keeping your website up and running. (Note: Install the tracking code manually or using the WordPress SEO plugin settings.)
- YouTube Channel: For recipes, you cannot ignore the importance of videos. Many people have made a thriving career out of video blogging Indian recipes on YouTube. Videos are gaining importance with Indian audience with easy access to high-speed internet on mobile phones. If you are going to create videos and short clips, set up your YouTube channel too.
- Feedburner (Optional): Allows your visitors to subscribe to your food blog by RSS or email. You can check the number of people who have subscribed to your food blog via email/feeds and also the visits. A tool past its glorious day, but still helpful. You can ignore this for food blogs as people are more reliant on Facebook, Twitter & Instagram now.
7) Start blogging!
Publish your recipes, restaurant review, articles about food & cuisines, stories, photos and videos.
Grow Your Food Blog in India: Step-by-Step
With your food blog all set up and ready, it’s time to promote your food blog. You also need to establish yourself as an Indian food blogger. How do we get traffic to our new food blog in India? How to reach out to other Indian food bloggers?
For success in food blogging, you need to:
- SEO techniques for promoting your food blog in Google, Bing
- Use your camera or smartphone for plenty of visuals: images & videos
- Focus on creating a repository of recipes
- Grab attention of people through social media platforms
- Connect with other food bloggers in your area and niche
- Create your identity as an Indian food blogger in your city
Don’t expect to get tonnes of traffic to your newly created food blog. It’s going to be slow and gradual growth.
In India, lots of people use Zomato for sharing their restaurant reviews. Nothing against it, but that’s not food blogging. You can use it to create awareness about your food blog. Don’t waste your time and energy there unless you are happy with free food and don’t need any money.
If you are not much of an outgoing person or don’t want to travel, you can focus on recipes. Create articles with photos and videos about recipes.
Recipes can be a staple for your Indian food blog. If you put in a couple of hours every day, you can have one awesome recipe video daily. Add the recipe video on your YouTube channel and then upload the recipe article along with your YouTube video and images on your food blog.
Share your food blog articles, images and videos like crazy.
Create a Facebook page for your blog, get a Twitter account, and also join Instagram. Ask each and every friend to like your Facebook page, follow you on Twitter and Instagram. Pinterest is another important social media platform for food bloggers. It’s particularly important when your target audience is from the US.
Keep posting on your social media profile regularly, several times a day. Engage with your followers.
For Facebook, you can schedule posts for several days and different times at once. You can keep your followers happy with new content updated every 3 hours during the day.
If I were to promote my Facebook food blog page, I would post four updates every day with a Facebook update schedule targeted at Indian people.
- morning: 9:00 am
- afternoon: 12:00 pm
- evening: 3:00 pm
- night: 8:00 pm
You should have a social media posting schedule for all the platforms. Create your own schedule based on your comfort and the behaviour of your target audience.
Why this type of aggressive social media update schedule? It keeps your blog fresh in minds of your followers. The more you share, the better the chance of getting more social media traction.
Don’t be scared or ashamed of sharing your food blogging work among your social media friends. Be pushy if you need to be.
How to Earn from Your Food Blog in India?
Money is the biggest source of inspiration. If you want to work as a professional food blogger, you must be able to generate an income from your food blogging.
As an Indian food blogger, what are the options to earn money from your food blog?
Food bloggers in the US and other developed countries earn $1,000-10,000 per month, sometimes even more. In India, the income from your food blog is more likely to be a lot less.
In general, the value of Indian traffic is very low. For every 1,000 page views, you can earn Rs 10-100 through advertisements shown on food blogs. If your food blog gets 1,00,000 visitors each month, you can earn Rs 5,000 to Rs 10,000 through advertisements. For higher income from your food blog, you need more website traffic.
Thankfully, getting a few lakh visitors per month is not very difficult for Indian food blogs. You can expect to earn Rs 25,000 – Rs 1,00,000 per month if you have a moderately successful food blog.
Ways to earn money from your food blog:
- Advertisements (Google Adsense)
- Affiliate marketing for kitchen appliances, utensils (Amazon, Flipkart affiliate programmes)
- YouTube video ad monetization
- Paid reviews and sponsored posts
For advertisements, the best option is to join Google Adsense. Once your website is approved, you can easily insert ad codes in your food blog. You get credit when your website visitors click on these ads or even simply view the ads in some cases. Please note that you should never click on the ads shown on your website. You should also not encourage such click in any manner. Be very specific with your close friends that they should also not click on your ads. If Google detect any artificial ad clicks, you might get kicked out of the ad network and lose a good source of revenue.
If you rely on Google Adsense, you can expect Rs 50-100 per 1,000 visitors. For a respectable income from ads alone, you will need a few lakh visitors each month.
Affiliate marketing, or referring products for purchases, is another way of generating money through blogging. You can join affiliate programmes of Amazon India or Flipkart and promote the products sold on these websites. You can put ads in your sidebar, display the product widgets in your content, or mention the products within your blog articles with referral links. With affiliate marketing, you get a commission on each sale.
YouTube advertising revenue can also be a good source of income. If you focus on video blogging with lots o recipe videos uploaded on your food blog YouTube channel, you can earn a good income through your food blog videos. Many food bloggers are 100% focused on creating videos for their YouTube channels. In general, you can get more advertising revenue per 1,000 views through videos on YouTube. It is also easy to promote your videos on YouTube.
That’s all that you need to know to start your food blog in India. You also know how to earn money from your food blog in India. Need any further assistance??? Do not hesitate to get in touch with us.
Best of luck for your new food blog in India!
Website Design & WordPress Installation Service: ➡ Need help creating your website or blog? We can help you pick the right web hosting, install WordPress blogging system optimally and help you launch your website. Connect with us for WordPress blog installation and web design services.